

Sound
Audio Listener
The Audio Listener acts as a microphone-like device. It receives input from any given Audio Source in the scene and plays sounds through the computer speakers. For most applications it makes the most sense to attach the listener to the Main Camera. If an audio listener is within the boundaries of a Reverb Zone reverberation is applied to all audible sounds in the scene. (PRO only) Furthermore, Audio Effects can be applied to the listener and it will be applied to all audible sounds in the scene.
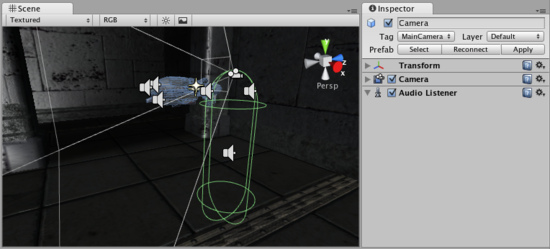
The Audio Listener, attached to the Main Camera
Properties
The Audio Listener has no properties. It simply must be added to work. It is always added to the Main Camera by default.
Details
The Audio Listener works in conjunction with Audio Sources, allowing you to create the aural experience for your games. When the Audio Listener is attached to a GameObject in your scene, any Sources that are close enough to the Listener will be picked up and output to the computer's speakers. Each scene can only have 1 Audio Listener to work properly.
If the Sources are 3D (see import settings in Audio Clip), the Listener will emulate position, velocity and orientation of the sound in the 3D world (You can tweak attenuation and 3D/2D behavior in great detail in Audio Source) . 2D will ignore any 3D processing. For example, if your character walks off a street into a night club, the night club's music should probably be 2D, while the individual voices of characters in the club should be mono with their realistic positioning being handled by Unity.
You should attach the Audio Listener to either the Main Camera or to the GameObject that represents the player. Try both to find what suits your game best.
Hints
- Each scene can only have one Audio Listener.
- You access the project-wide audio settings using the Audio Manager, found in the menu.
- View the Audio Clip Component page for more information about Mono vs Stereo sounds.
Audio Source
The Audio Source plays back an Audio Clip in the scene. If the Audio Clip is a 3D clip, the source is played back at a given position and will attenuate over distance. The audio can be spread out between speakers (stereo to 7.1) (Spread) and morphed between 3D and 2D (PanLevel). This can be controlled over distance with falloff curves. Also, if the listener is within 1 or multiple Reverb Zones, reverberations is applied to the source. (PRO only) Individual filters can be applied to each audio source for an even richer audio experience. See Audio Effects for more details.
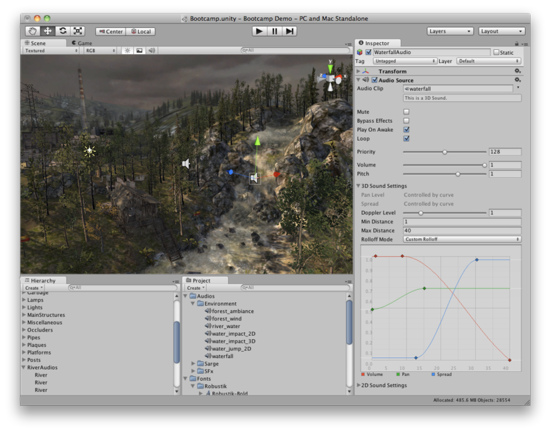
The Audio Source gizmo in the Scene View and its settings in the inspector.
Properties
| Audio Clip | Reference to the sound clip file that will be played. |
| Mute | If enabled the sound will be playing but muted. |
| Bypass Effects | This Is to quickly "by-pass" filter effects applied to the audio source. An easy way to turn all effects on/off. |
| Play On Awake | If enabled, the sound will start playing the moment the scene launches. If disabled, you need to start it using the Play() command from scripting. |
| Loop | Enable this to make the Audio Clip loop when it reaches the end. |
| Priority | Determines the priority of this audio source among all the ones that coexist in the scene. (Priority: 0 = most important. 256 = least important. Default = 128.). Use 0 for music tracks to avoid it getting occasionally swapped out. |
| Volume | How loud the sound is at a distance of 1 world unit (1 meter) from the Audio Listener. |
| Pitch | Amount of change in pitch due to slowdown/speed up of the Audio Clip. Value 1 is normal playback speed. |
| 3D Sound Settings | Settings that are applied to the audio source if the is a 3D Sound. |
| Pan Level | Sets how much the 3d engine has an effect on the audio source. |
| Spread | Sets the spread angle to 3d stereo or multichannel sound in speaker space. |
| Doppler Level | Determines how much doppler effect will be applied to this audio source (if is set to 0, then no effect is applied). |
| Min Distance | Within the MinDistance, the sound will stay at loudest possible. Outside MinDistance it will begin to attenuate. Increase the MinDistance of a sound to make it 'louder' in a 3d world, and decrease it to make it 'quieter' in a 3d world. |
| Max Distance | The distance where the sound stops attenuating at. Beyond this point it will stay at the volume it would be at MaxDistance units from the listener and will not attenuate any more. |
| Rolloff Mode | How fast the sound fades. The higher the value, the closer the Listener has to be before hearing the sound.(This is determined by a Graph). |
| Logarithmic Rolloff | The sound is loud when you are close to the audio source, but when you get away from the object it decreases significantly fast. |
| Linear Rolloff | The more far away from the audio source you go, the less you can hear it. |
| Custom Rolloff | The sound from the audio source behaves accordingly to how you set the graph of roll offs. |
| 2D Sound Settings | Settings that are applied to the audio source if the is a 3D Sound. |
| Pan 2D | Sets how much the engine has an effect on the audio source. |
Types of Rolloff
There are three Rolloff modes: Logarithmic, Linear and Custom Rolloff. The Custom Rolloff can be modified by modifying the volume distance curve as described below. If you try to modify the volume distance function when it is set to Logarithmic or Linear, the type will automatically change to Custom Rolloff.
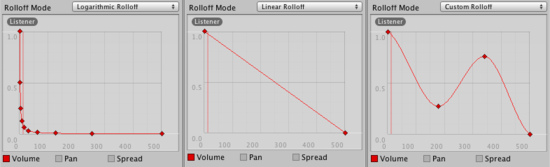
Rolloff Modes that an audio source can have.
Distance Functions
There are several properties of the audio that can be modified as a function of the distance between the audio source and the audio listener.
Volume: Amplitude(0.0 - 1.0) over distance.
Pan: Left(-1.0) to Right(1.0) over distance.
Spread: Angle (degrees 0.0 - 360.0) over distance.
Low-Pass (only if LowPassFilter is attached to the AudioSource): Cutoff Frequency (22000.0-10.0) over distance.
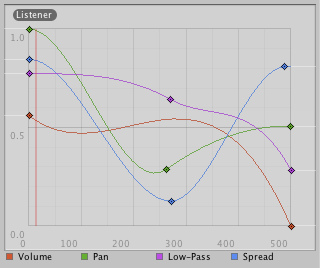
Distance functions for Volume, Pan, Spread and Low-Pass audio filter. The current distance to the Audio Listener is marked in the graph.
To modify the distance functions, you can edit the curves directly. For more information, see the guide to Editing Curves.
Creating Audio Sources
Audio Sources don't do anything without an assigned Audio Clip. The Clip is the actual sound file that will be played back. The Source is like a controller for starting and stopping playback of that clip, and modifying other audio properties.
To create a new Audio Source:
- Import your audio files into your Unity Project. These are now Audio Clips.
- Go to from the menubar.
- With the new GameObject selected, select .
- Assign the Audio Clip property of the Audio Source Component in the Inspector.
Note: If you want to create an audio source just for one Audio Clip that you have in the Assets folder, you can drag and drop that Audio Clip to the scene view and an Audio Source game object will be created automatically for it.
Platform specific details
 iOS
iOS
On mobile platforms compressed audio is encoded as MP3 for speedier decompression. Beware that this compression can remove samples at the end of the clip and potentially break a "perfect-looping" clip. Make sure the clip is right on a specific MP3 sample boundary to avoid sample clipping (Tools to perform this is widely available). For performance reasons audio clips can be played back using the Apple hardware codec. To enable this check the "Use Hardware" checkbox in the import settings. See the Audio Clip documentation for more details.
 Android
On mobile platforms compressed audio is encoded as MP3 for speedier decompression. Beware that this compression can remove samples at the end of the clip and potentially break a "perfect-looping" clip. Make sure the clip is right on a specific MP3 sample boundary to avoid sample clipping (Tools to perform this is widely available).
Audio Clip
Audio Clips are audio data used by Audio Sources. Unity supports mono, stereo and multi (up to 8) channels audio assets. Unity supports importing the following audio file formats: .aif, .wav, .mp3, and .ogg, and the following tracker module file formats: .xm, .mod, .it, and .s3m. The tracker module assets works the same way as any other audio assets in Unity except no waveform preview can be rendered to the asset import inspector.
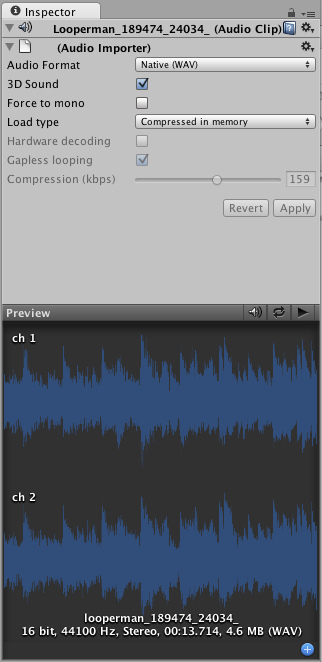
The Audio Clip Inspector
Properties
| Audio Format | The specific format that will be used for the sound at runtime. |
| Native | Larger file size, higher quality. Best for very short sound effects. |
| Compressed | Smaller file size, lower/variable quality. Best for medium length sound effects and music. |
| 3D Sound | If enabled, the sound will play back in 3D space. Both Mono and Stereo sounds can be played in 3D. |
| Force to mono | If enabled, the audio clip will be down-mixed to a single channel sound. |
| Load Type | The way Unity load audio assets runtime. |
| Decompress on load | Decompress sounds upon load. Use this for smaller compressed sounds to avoid the performance overhead of decompressing on the fly. Beware that decompressing sounds on load will use ~10x more memory than keeping them compressed in memory, so don't use this for large files. |
| Compressed in memory | Keep sounds compressed in memory and decompress while playing. This have a slight performance overhead (esp. for Ogg/Vorbis compressed files) so only use this for bigger files. |
| Stream from disc | Stream audio data directly from disc. This uses a fraction of the original sounds size of memory. Use this for your music or very long tracks. Depending on the hardware, a general advice is to keep this down to 1-2 simultaneously streams. |
| Compression | Amount of Compression to be applied to a Compressed clip. Statistics about file size can be seen beneath the slider. It is suggested to drag the slider to a place that leaves the playback "good enough" but still at a small enough size to meet your file size/distribution needs. |
| Hardware Decoding | (iOS ONLY) Available for compressed audio on iOS devices. Uses Apple's hardware decoder for less CPU intensive decompression. Check out Platform Specific details for more info. |
| Gapless looping | (Android/iOS ONLY) Use this when compressing a perfect looping audio source file (in a non-compressed PCM format) to preserve the loop. Standard MPEG encoders introduce silence around the loop point, which will play as little "click" or "pop". Unity handles this smoothly for you. |
Importing Audio Assets
Unity supports both Compressed and Native Audio. Any type of file (except MP3/Ogg Vorbis) will be initially imported as Native. Compressed audio files must be decompressed by the CPU while the game is running, but are smaller in file size. If Stream is checked the audio is decompressed on the fly, or else the audio is decompressed entirely upon load. Native PCM formats (WAV, AIFF) have the benefit of being higher fidelity without increasing CPU taxation, but create much larger files. Module files (.mod,.it,.s3m..xm) can deliver very high quality with an extremely low footprint.
As a general rule of thumb, Compressed audio(or modules) are best for long files like background music or dialog, and uncompressed is better for short sound effects. Tweak the amount of Compression with the compression slider to just before the difference in sound quality is noticeable.
Using 3D Audio
If an audio clip is marked as a 3D Sound then it will be played back to simulate its position in the game world's 3D space. 3D sounds emulate distance and location of sounds by attenuating volume and panning across speakers. Both mono and multiple channel sounds can be positioned in 3D. For multiple channel audio, use the spread option on the Audio Source to spread and split out the discrete channels in speaker space. Unity offers a variety of options to control and fine-tune the audio behavior in 3D space. Take a look at Audio Source.
Platform specific details
 iOS
iOS
On mobile platforms compressed audio is encoded as MP3 for less CPU intensive decompression.
For performance reasons audio clips can be played back using the Apple hardware codec. To enable this check the "Hardware Decoding" checkbox in the Audio Importer. Note that only one hardware audio stream can be decompressed at a time, including the background iPod audio.
If the hardware decoder is not available, the decompression will fall back on the software decoder (on iPhone 3GS or newer Apple's software decoder is used over Unity's(FMOD) own decoder).
 Android
On mobile platforms compressed audio is encoded as MP3 for less CPU intensive decompression.